How To Mix Heavy Rhythm Guitars With Amp Sims
The process of getting excellent-sounding heavy rhythm guitars to sit well in a mix using amp sims is a complex topic, with a few different layers. Here’s each step, in chronological order, that makes a big difference in the end result.
Gain staging
The first thing to consider is gain staging. It’s been video-essayed to death at this point, so I won’t go into too much depth here - but as a general rule of thumb, you want to chug on a palm muted low power chord as hard as possible to set your input level on your audio interface. Increase the gain on your preamp until it’s just below red (clipping.) That will ensure the optimal signal-to-noise ratio. There’s a myth that’s still going around, that even I was convinced of for a while, that you should leave your input gain on zero. This is not true. You want the hottest signal you can get without clipping, while playing a palm-muted chug.
Playing technique
Like any recording for any instrument, the end result will only be as good as what you’re able to capture. Assuming that that is an obvious statement, here are some tips for getting the cleanest takes possible when recording heavy rhythms.
- Pretend you’re a machine. Not a human. Yes, we want recordings to sound human. But they will, as long as you don’t edit them to shreds. So with that in mind, play like you’re a machine, executing code. This mindset shift is something I learned from Josh Middleton of Sylosis. It really helps you to forget about everything else and lock in. It doesn’t work the best for playing legato, or for slow songs. But for heavy rhythms, the tighter and more precise you can play, the better.
- Mute any strings that don’t need to ring out, at all times. This is crucial. Excessive string noise makes any guitar recording sound amateur. Use either your left or right hand, or both, depending on what works the best for the part.
- Use fresh strings and a fresh pick. While not as important as the other tips, this does make a small difference.
Amp settings
The main thing I want to convey here is that most genres of heavy music sound heavy because of the energy of the riffs, not the distortion levels used. Nine times out of ten, backing the gain off on your amp’s front end will actually yield better, tighter results than cranking it all the way. Give yourself enough juice to hear the saturation of the amp, but no more. This advice falls apart for certain genres, where noisy, excessive distortion is a key part of the sound - but it’s still worth trying. Distortion can always be added later in the mixing stage.
Cabinet/mic sim
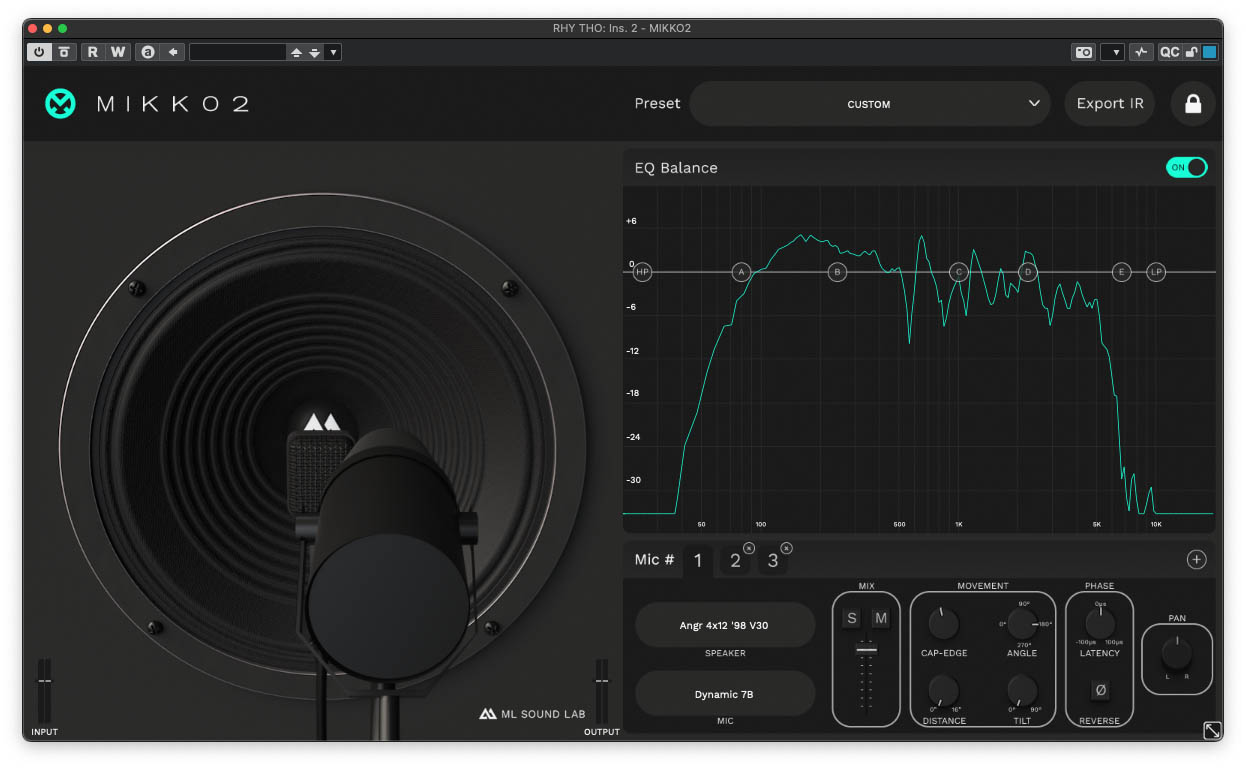
If all of the previous steps have been handled with care, the cab/mic sim portion can still absolutely ruin things for you and make you wish you never tried. It is absolutely crucial to get a good cabinet sound. In most amp sims, you have the option of either using built-in cabinet/mic setups, or loading your own IRs. Nine times out of ten, you’re going to get better results using an IR. But not just any IR. There’s hundreds of thousands of options out there, and not all are created equal. I strongly advocate for the use of natural phase IRs. Most commercially available IRs are minimum phase transformed. This allows the user to mix several IRs together without phasing issues, but it also removes the realism from the IR. Removing all of the phase information removes any impact that mic distance would have on a recorded guitar tone. This is a big part of what makes a guitar tone sound realistic. With that in mind, I strongly recommend using either Mikko2 by ML Sound Lab, or finding IR packs that include raw/natural phase captures. Some companies that offer these include York Audio, ML Sound Lab, and Atlas Custom Cabinets. Another good option is OTTO Audio, who don’t offer natural phase IRs per se, but their method of phase-aligning multi-mic IRs sounds fantastic, if you want a more full-range tone.
EQ
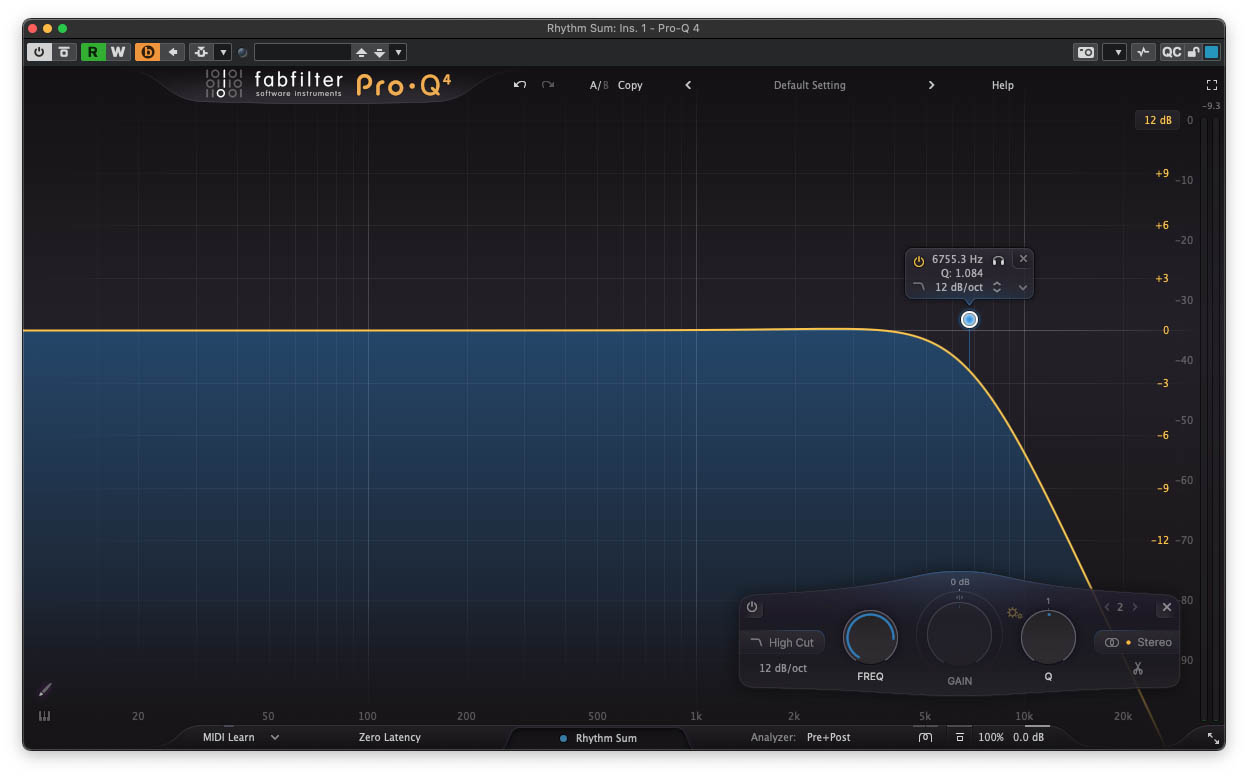
Equally as important as the cab and mic, EQ can make or break a heavy rhythm tone. Typically, amp sims have a lot of extra high-end information, that you would never find in a real mic’ed guitar amp. So, the first course of action is to roll off or even shelve down the high end. Start with a low-pass filter at 12kHz, and work your way down, until it sounds smooth, without losing the aggression. This is a skill that requires practice. You probably won’t get the hang of it right away. I often land between 5kHz and 7kHz with my filtering when working with amp sims.
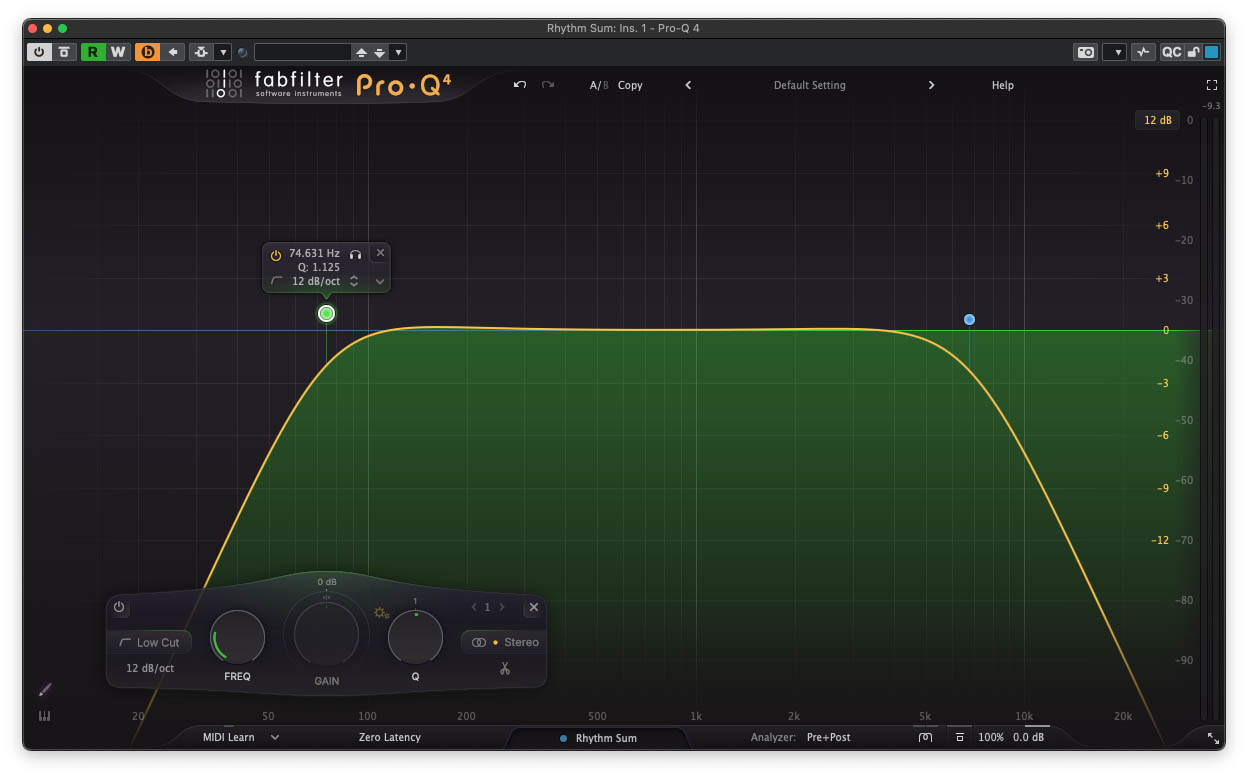
 The next course of action is to eliminate low-end rumble. Start with a high pass filter at 40Hz, and work your way up until you notice a loss of beefiness in the chugs. Roll it back down, and see how it sounds in the mix with drums and bass. I typically settle on somewhere between 75Hz and 100Hz, depending on the tempo of the song, the tuning, and the genre.
 Next, deal with the mids. Often you will find that the rhythm guitars eat up precious frequencies that the vocals end up fighting against. To remedy this, make several small dips in the 200Hz-1,500kHz region, or perhaps one wide-Q dip at around 1kHz. Every mix is different, and every vocalist is certainly different, but this is an extremely common course of action when mixing heavy guitars. Even if you don’t have vocals in the song, it will still sound less congested with some careful mid-scooping.
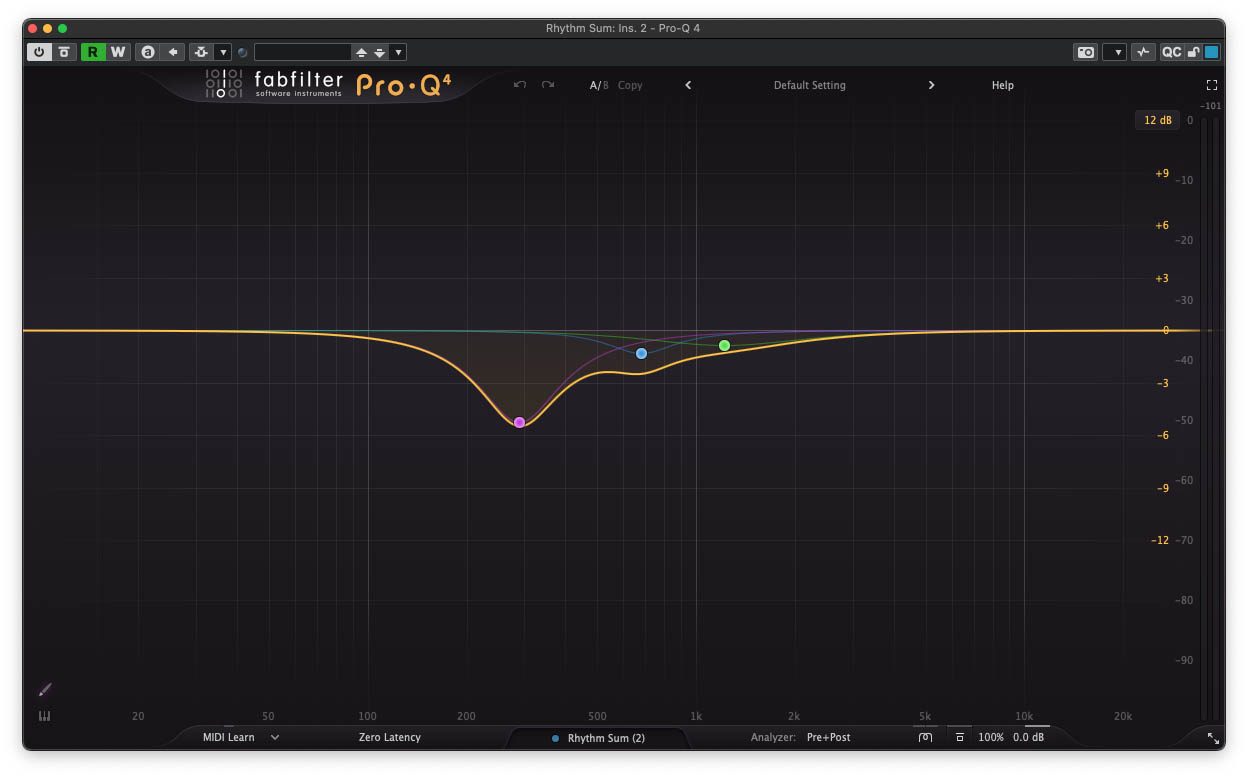 The rest is up to taste. Sometimes you’ll need to shelve down the low end below 120 hz slightly, particular on chugs. A dynamic EQ or multiband compressor works great for this. Other times, you’ll need to tame shrill frequencies with a notch filter or two.
Saturation and compression
The last piece of the puzzle is tone-shaping, or more precisely, wave-shaping. Both saturation and compression change the shape of the audio waves themselves to achieve their effect. Sometimes a slight dose of gentle compression, though subtle, can make a guitar track sound more even, more consistent. Sometimes, heavier compression is needed, if the performance is uneven (or if the track calls for it stylistically.) Compression isn’t always needed on heavy rhythms, though. The distortion itself is in fact compressing the signal quite a bit.
Saturation is basically just extra distortion, added after the fact, to help a track sit in the mix better. It’s not something that is always necessary, but I use a touch of high-end saturation on a majority of rhythm guitar busses that I mix. The high-end focused saturation helps the attack of the guitars cut more, and makes them sound more “finished.” I would avoid low-end saturation whenever possible, on any element in a heavy mix. The cleaner the low end is, the better, typically. For an absolutely fantastic one-stop shop plugin for both compression and saturation on heavy guitars, I can’t recommend the JST Bus Glue Guitars enough. I’ve used it for years, and it has never let me down.
So that’s about it. It’s a lot to soak in, but each element really does contribute to a professional-sounding end result. Good luck with your mixing journey, and I hope this was of some use to you all out there!